Saturday 30 June 2012

F-toys 1/144 - Gloster Meteor F.1 - WiP - Cockpit

F-toys 1/144 - Gloster Meteor F.1 - WiP - Cockpit 1

Quick new cockpit for the meteor. After painting and adding the panel line wash to this Gasphon i really started to think it looked better than i thought it would as so wanted to add a bit more detail.

Heres the finished new cockpit before the canopy is glued in place and becomes a whole lot less visiable.

Used the decals for the instrument panel which came with the Hawker Hunter, modelled the gauges on the Hunter so had these left over to use in the Meteor, added the 2 piece of clear for the very simple war era sight.

F-toys 1/144 - Gloster Meteor F.1 - WiP - Cockpit 2

Very quick cockpit constructed to replace the rather plain f-toys one, added the instrument panel, new seat and detail to the rear of the seat.

F-toys 1/144 - Gloster Meteor F.1 - WiP - Cockpit 3

Next stop finished.
Ian

Wednesday 27 June 2012

Macross 1/144 - VF-1S Strike Valkyrie - "Goldstars" -

Macross 1/144 - VF-1S Strike Valkyrie - "Goldstars" - 1

My latest remodelled F-toy 1/144 VF-1 Valkyrie based on Royal Air Force No. 31 Squadron "Goldstar".

Used the same sort of pale grey with a touch of blue as the squadrons Tornados, this is the commander S type head with the strike super parts this guy is the squadron leader.


Macross 1/144 - VF-1S Strike Valkyrie - "Goldstars" - 2

Macross 1/144 - VF-1S Strike Valkyrie - "Goldstars" - 3

Macross 1/144 - VF-1S Strike Valkyrie - "Goldstars" - 4

Macross 1/144 - VF-1S Strike Valkyrie - "Goldstars" - 5


Ian

Sunday 24 June 2012

Real Grade 1/144 - MS-05 Zaku I - WiP 5 - Backpack + Weapons

Real Grade 1/144 - MS-05 Zaku I - WiP 8 - Backpack

This is the last WiP for my MS-05 Zaku I and soon will be ready to paint, still got to receive some parts for to use the shield but basically the mecha is done.

What needed to be done on the backpack is close up some of the panel on the side where the Zaku II cables enter and to the top where the Zaku II has a pair of maneuverings verniers thrusters, felt like the easiest job on the entire Zaku.

Real Grade 1/144 - MS-05 Zaku I - WiP 7 - Weapons

Modelling the weapons was a piece of cake, all parts are from the HGUC MS-05 Zaku I.

Rocket launcher ive paint and used before but without hiding the seams, this time i putty the seam and removed a little of the detail which where these small cables which i really didn't like. The rifle has had it ammo cartridge replaced with the RG one, which suddenly makes it look a whole lot more detail and realistic very quickly.

I think the bottom weapons is a Panzerfaust Grenade Launchers from the U.C. Hardgraph Zaku II Ground War set.
Ian

Wednesday 20 June 2012

1/144 WiP - Revell Hawker Hunter FGA.9 + F-toys Gloster Meteor F.1 - Painted and ready to decal

1/144 - Revell Hawker Hunter FGA.9   F-toys Gloster Meteor F.1 - Painted and ready to decal

Painted these 2 at the same time over the weekend, same colours for the post war jets makes it a two birds with one stone gig.

Painted the camo pattern using white-tac, which ive read is better to use on models than blu-tac which apparently ruins the paint. Worked out really nice, i like how the finish between the green and grey has a slight misty but clean appearance which i think it really realistic.

When i first started the Meteor it was only going to be a simple re-model with no detail added but after working on this, i really want to put a but more attention into it so will be adding a whole new cockpit. (Without ruin the existing paint work, i hope)

Decals i will be using are the Xtradecal 1/144 Hawker Hunters in RAF and Foreign Service, which nearly share all the decal i need with the Gloster Meteor except for the WW2 era lettering on the side of the tail.

Ian

Sunday 17 June 2012

Museum of Berkshire Aviation

Museum of Berkshire Aviation - 1

Recently visited the very local Museum of Berkshire Aviation which is only a 20 minute cycle from my home and for some reason have never visited. Small museum on the site of the old Woodley Aerodrome which is now a just house but the area of Woodley basically started out as a airfield. Most of the aircraft and displays are from Phillips & Powis and Miles Aircraft companies from during the WW2 period to later Handley Page (Reading) Ltd and by Fairey Aviation.    

Found this article which has a good review of whats on display.

Fairey Gannet in the process of being restored.                              

Museum of Berkshire Aviation - 2

Fairey Jet Gyrodyne      

Museum of Berkshire Aviation - 3

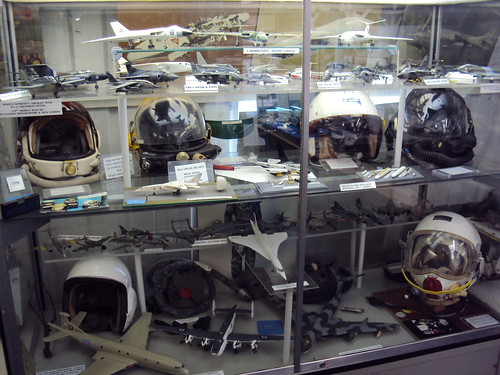
Quite a few local built helmets, if i remember rightly the middle shelf, far left is a TSR-2 helmet, cool.

Museum of Berkshire Aviation - 4

Lots of little display and the top of the Westland Scout in Empire Test Pilot School colours.

Museum of Berkshire Aviation - 5

Quite a few displays about Douglas Bader, unfortunatley the Woodley Aerodrome is famous for being one of the places Bader lost a leg.   

Museum of Berkshire Aviation - 6

Miles M.100 Student, only one built and being restored.  

Museum of Berkshire Aviation - 7

R.A.E. – Vickers Transonic Research Rocket to the right and at tha back of the hanger the sliver Miles M.25 Martinet.

Museum of Berkshire Aviation - 8

Westland Scout in Empire Test Pilot School colours and was surprised to see it and those famous colours here.                              

Museum of Berkshire Aviation - 9

After the main spitfire factory got bombed during the war, production was moved to various smaller factories around the country and some where even built in Reading which i never knew.

Museum of Berkshire Aviation - 10

Fairey Gannet engine with original Royal Navy yellow.                                                              

Museum of Berkshire Aviation - 11

Fairey Gannet

Museum of Berkshire Aviation - 12

Handley Page Dart Herald

Museum of Berkshire Aviation - 13

Handley Page Dart Herald cockpit.

Museum of Berkshire Aviation - 14

Handley Page Dart Herald, a royal interior.

Museum of Berkshire Aviation - 15


Museum of Berkshire Aviation - 16

The Bader Way named and open i believe by the man himself, all the roads in Woodley are named after Aircraft or Aviators famous to the area.

Museum of Berkshire Aviation - 17

Ian

Saturday 16 June 2012

Real Grade 1/144 - MS-06F Zaku II "Elite Guard" - WIP - Repainted

Real Grade 1/144 - MS-06F Zaku II "Elite Guard" - WIP - Repainted

Repainted and new decals applied and basically finished except for a little weathering.

Completely taken apart and all the mechanical skeleton or inner frame was repainted 50/50 Vallejo Black/Metallic Black from the original Grey. And the lighter greens panels have been repainted the same as the as the rest of the body so that all the torso is one shade of dark green which is Vallejo Field Green and the limbs and head are all the same Vallejo Pale Green. Much more pleased with the way it looks now compared to what it was, all patchwork quilt like which to me just looked wrong on a mass produced weapon of war.

Of the parts that have be repainted i reapplied decals but have really reduced the number i had compared to last time, i did follow the instructions but only applied about half so as not to make it look too "busy".

Soon after 9 months i will have finished my first RG Zaku, i plan on building many!
Ian

Thursday 14 June 2012

Real Grade 1/144 - MS-05 Zaku I - WiP 4 - Head / Monitor

Real Grade 1/144 - MS-05 Zaku I - WiP 6 - Head / Monitor

The head or monitor would be the correct mobile suit term of my Real Grade MS-05 Zaku I conversion. Modelled both the normal head and one with the commander antenna which i can swap any time which is a nice feature in the RG Zaku, giving 2 top parts of the head with the MS-06F kit.

Made by filling the connections where the cables are on the MS-06, added the central mono-eye guard taken off the HGUC head (talk about a blind spot) and added the fin at the back with plasticard, also sharpened the edges of the commander antenna which i will be doing on all my future zaku builds. Sounds kinda easy but getting the central column eye guard in the correct place and sanding it flush with the existing model took quite some time and much repeating with putty, especially both ends sitting on top of the nose.

Ian

Sunday 10 June 2012

F-toys 1/144 - Gloster Meteor F.1 - WiP

F-toys 1/144 - Gloster Meteor F.1 - WiP

Been wanting to remodel this gasphon for some time and since im also modelling a Hawker Hunter thought it would be good idea to paint both at the same time since both have the same camo scheme.

Very nice little model and probable has more detail than the Revell Hunter, all ive done is correct some panel line, hide some quite large seam lines and sanded off all the painted on camo patterns and marking and once primed looks like a proper model. What really surprised me was the landing gear, really very detailed.

Ian

Friday 8 June 2012

Revell 1/144 - E-2C Hawkeye - Completed -

Revell 1/144 - E-2C Hawkeye - Completed - 1

One of Revell's best 1/144 scale models, the E-2C Hawkeye built straight out of the box using decals supplied and no detailing added at all. Which i will be doing next time i build this with folded wings.

A wonderful little kit and a must for any 1/144 modeller, took 6 months to complete but amazingly painted, decaled and generally finished in a week, which surprised me. Used this as a little experimental model too, mostly trying different weathering technique.

Revell 1/144 - E-2C Hawkeye - Completed - 2

Revell 1/144 - E-2C Hawkeye - Completed - 3

Revell 1/144 - E-2C Hawkeye - Completed - 4

Still got quite a few WiPs to finish which have been on the shelf for far too long.
Ian

Sunday 3 June 2012

Revell 1/144 - E-2C Hawkeye - Ready to launch

Revell 1/144 - E-2C Hawkeye - Ready to launch by AntSizedMan
 
After leaving this unfinished for more than 6 months i painted, decaled, weathered and finished in a week. 
 Ian

Friday 1 June 2012

Real Grade 1/144 - MS-05 Zaku I - WiP 3 - Leg modelling done.

Real Grade 1/144 - MS-05 Zaku I - WiP 5 - Leg modelling done.

Got what i thought would be the most difficult part of this build completed, until i prime and see all the defects that is.

Filling all the spaces where the boosters and cable on the MS-06 Zaku II are which are absent on the MS-05 was the easier part, then getting these new parts to fit flush with the existing model is what took time, lots of delicate sanding hoping that i wouldn't take away too much and have to start over again.

Thigh part took the most time, making the outside thigh look like the inside and fitting correctly when moving, whew glad that done. Looking at it now i realise i didn't extend the existing panel line.

Torso, shoulder guard and legs done, still to go, head, backpack, weapons and maybe the shield.
Ian